Activating Office 2016 using CMD is a method that many users find effective and convenient. With the increasing reliance on Microsoft Office for both personal and professional tasks, being able to activate this essential software is crucial. This guide will walk you through the steps required to activate Office 2016 using the command prompt (CMD), ensuring that you can utilize all its features without any interruptions.
In this article, we will delve into the process of activation, discuss the prerequisites, and offer troubleshooting tips to help you along the way. This guide is designed to provide you with the expertise and knowledge necessary to navigate the activation process smoothly. Whether you are a tech-savvy individual or a beginner, you'll find this information valuable and easy to understand.
By the end of this article, you will not only learn how to activate Office 2016 using CMD but also understand the importance of proper activation methods and the potential risks associated with unauthorized activation. Let’s get started!
Table of Contents
- 1. Introduction
- 2. Prerequisites for Activation
- 3. Step-by-Step Guide to Activate Office 2016 via CMD
- 4. Common Issues During Activation
- 5. Troubleshooting Activation Problems
- 6. Benefits of Activating Office 2016
- 7. Conclusion
- 8. Resources for Further Assistance
1. Introduction
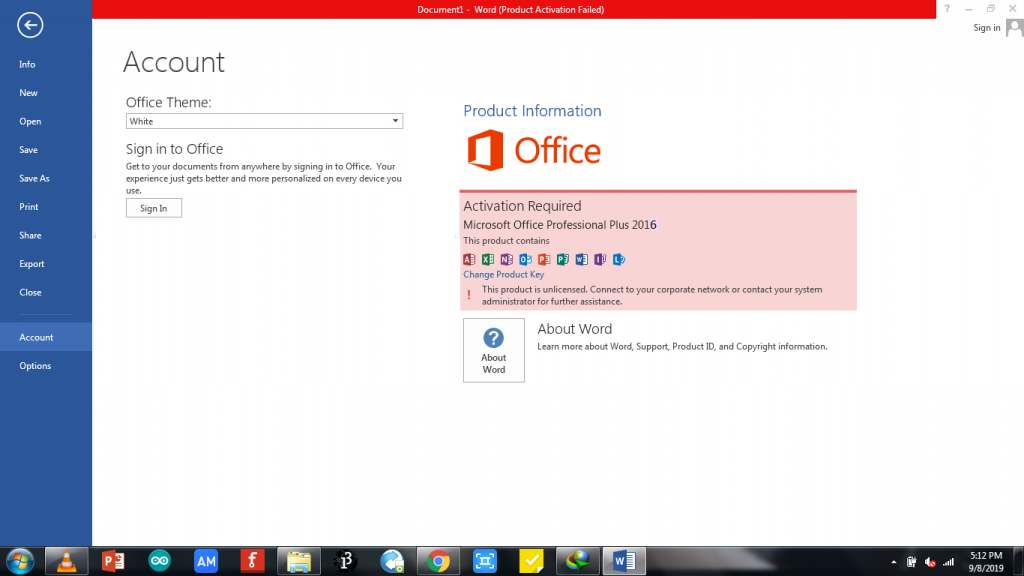
Microsoft Office 2016 is a powerful suite of applications that enhance productivity and collaboration. However, to fully utilize its features, it needs to be activated properly. Activating Office 2016 using CMD is a straightforward process that can save you time and hassle.
2. Prerequisites for Activation
Before you begin the activation process, ensure that you have the following:
- A valid product key for Office 2016.
- Administrative rights on your computer.
- A stable internet connection (optional, depending on the method used).
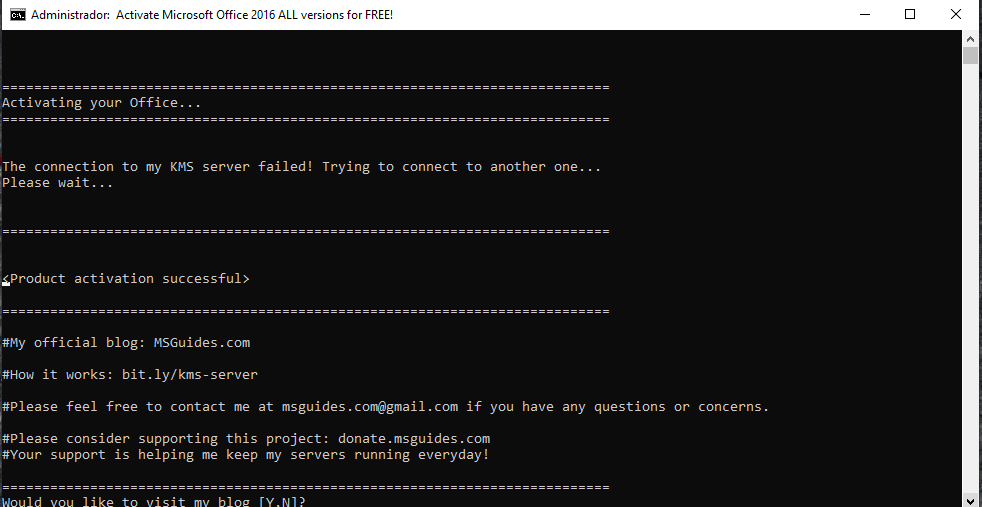
3. Step-by-Step Guide to Activate Office 2016 via CMD
Follow these detailed steps to activate Office 2016 using the command prompt:
Step 1: Open Command Prompt as Administrator
To do this, search for "cmd" in the Start menu, right-click on Command Prompt, and select "Run as administrator."
Step 2: Navigate to the Office Installation Directory
Use the following command to navigate to the Office installation folder. Replace 'C' with the drive letter where Office is installed:
cd C:\Program Files\Microsoft Office\Office16
Step 3: Enter the Product Key
Input the following command, replacing "XXXXX-XXXXX-XXXXX-XXXXX-XXXXX" with your actual product key:
cscript ospp.vbs /inpkey:XXXXX-XXXXX-XXXXX-XXXXX-XXXXX
Step 4: Activate Office
To complete the activation, type the following command:
cscript ospp.vbs /act
4. Common Issues During Activation
While activating Office 2016 via CMD, users may encounter several common issues:
- Invalid product key error.
- Unable to connect to the server.
- Access denied due to insufficient permissions.
5. Troubleshooting Activation Problems
If you experience problems during activation, consider the following troubleshooting tips:
- Ensure you have entered the product key correctly.
- Check your internet connection.
- Run Command Prompt as an administrator.
6. Benefits of Activating Office 2016
Activating Office 2016 has several advantages:
- Access to all features and updates.
- Improved security and stability.
- Elimination of notifications related to unactivated software.
7. Conclusion
Activating Office 2016 using CMD is a straightforward process that can enhance your productivity. By following this guide, you should be able to activate your software without any issues. Remember to use legitimate methods and product keys to avoid any potential legal issues.
If you have any questions or need further assistance, feel free to leave a comment below or share your experiences with activating Office 2016.
8. Resources for Further Assistance
For more information on Microsoft Office, you can refer to the following resources:
Thank you for reading! We hope this guide has been helpful. Be sure to check back for more useful articles and tips!